Burlap is a great choice for affordable and stylish home decor. It has a rustic charm and texture that makes it perfect for wall art. Whether you want to add nature, make a statement, or warm up a room, DIY burlap hanging wall art is easy to make. This guide will show you how to create beautiful burlap wall art for your home.
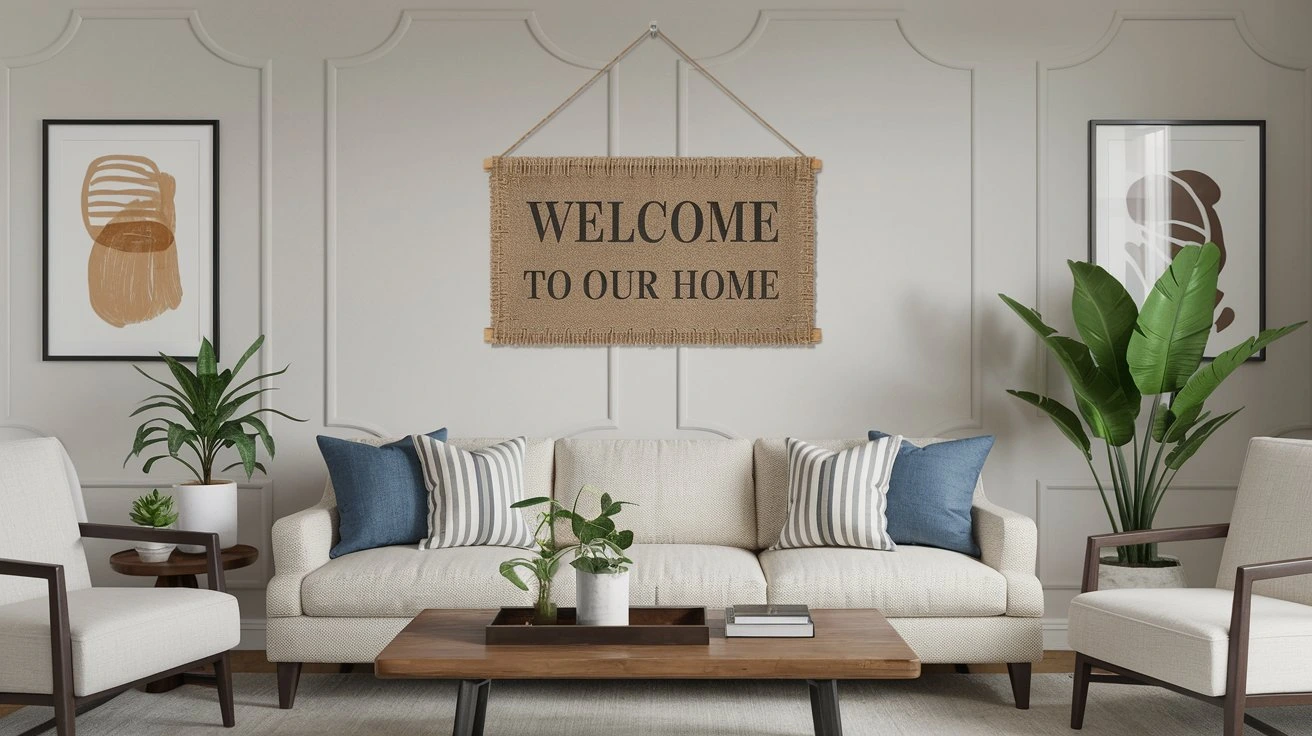
Table of Contents
Why Choose Burlap for Wall Art?
Burlap is made from jute or hemp and is known for its coarse texture and durability. It fits well with many interior styles, from boho-chic to farmhouse decor. Here are some reasons why burlap is a great choice for wall art:
- Rustic Appeal: Burlap’s natural color and texture add a rustic, organic feel to any room.
- Versatility: You can customize burlap with paints, dyes, embroidery, and stencils to match your room’s color scheme.
- Durability: Burlap is tough and lasts long, making your artwork durable.
- Budget-Friendly: Burlap is cheap and easy to find, making it a cost-effective option for unique wall decor.
Materials Needed for DIY Burlap Hanging Wall Art
Before starting, gather these materials for a smooth crafting experience:
- Burlap fabric (cut to the size you desire for your wall art)
- Wooden dowels or a wooden frame for hanging the burlap
- Scissors (for cutting the fabric)
- Hot glue gun or fabric glue
- Acrylic paint or fabric paint (for creating designs or patterns)
- Brushes (for painting or stenciling)
- Needle and thread (for embroidery or adding texture)
- Stencils (optional, for intricate designs)
- Twine or rope (for hanging the artwork)
- Staples or nails (if you are using a frame)
With these materials, you can make a piece of wall art that complements your home decor.
Step-by-Step Instructions for Creating DIY Burlap Hanging Wall Art
Step 1: Select Your Design
The first step is to choose your design. Your design can be simple or complex. Here are some ideas:
- Abstract art: Paint bold strokes or geometric patterns for a modern touch.
- Nature-inspired designs: Use stencils to create leaf, flower, or tree motifs.
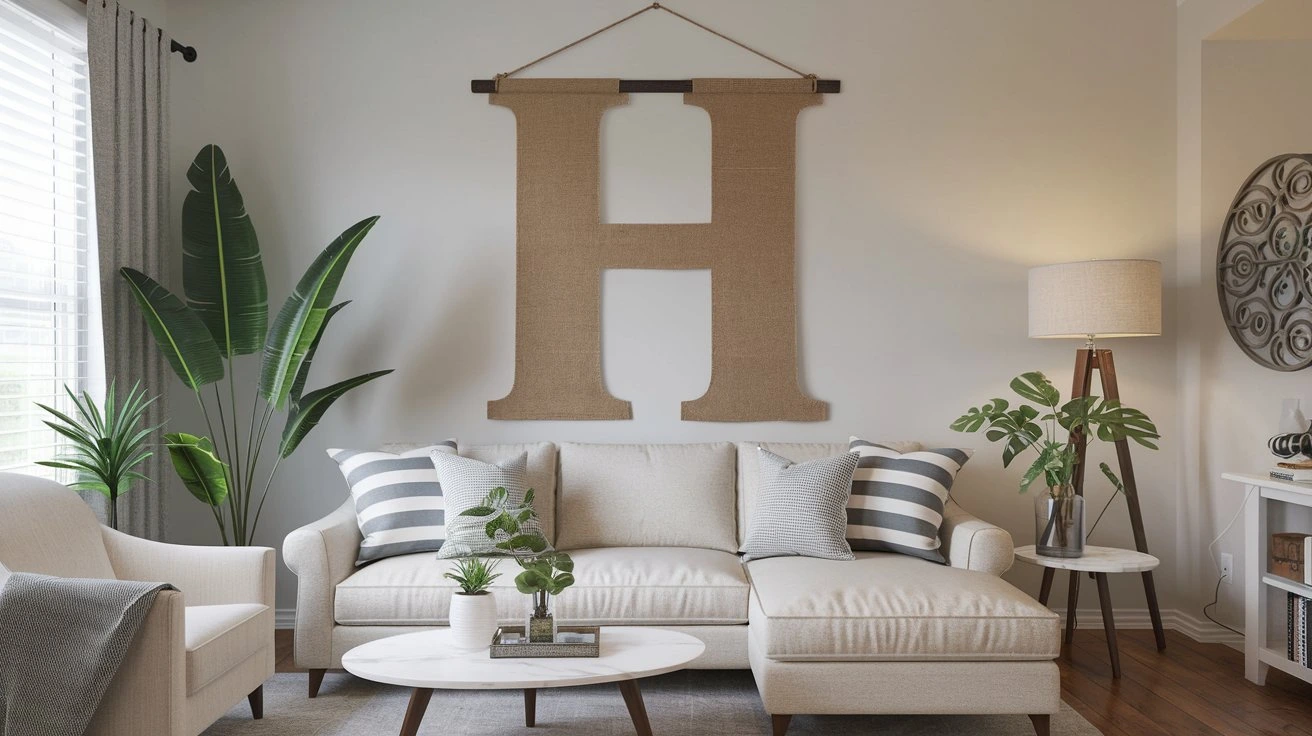
- Typography art: Use bold lettering to display inspirational quotes or words.
- Boho designs: Add fringe, beads, or embroidery to give your artwork a relaxed, bohemian vibe.
Think about your room’s color palette and style when choosing your design. This will help your burlap artwork enhance your decor.
Step 2: Cut and Prepare the Burlap
After choosing your design, cut the burlap fabric to the desired size. Make sure to leave extra fabric around the edges to prevent fraying. To stop the edges from unraveling, you can either hem them with a needle and thread or use a hot glue gun to secure them.
Step 3: Create Your Design on Burlap
It’s time to add your design to the burlap. Use a paintbrush for smooth strokes if you’re painting. For detailed designs, stencils work well. Let the paint dry before moving on.
You can also use embroidery for texture. Colorful threads can outline shapes or add patterns. Embroidery brings a touch of sophistication to your artwork.
Step 4: Attach the Burlap to the Frame or Dowels
After your design dries, mount the burlap on a frame or dowels. Staple it to a wooden frame tightly. For a rustic look, use wooden dowels at the top and bottom.
For dowels, fold the top edge over and glue it. Adding a second dowel at the bottom keeps the fabric taut.
Step 5: Add the Hanging Mechanism
To hang your burlap wall art, use twine or rope on the top dowel. Measure and attach it with hot glue or nails. This keeps the artwork straight.
Step 6: Hang Your Burlap Art
Your DIY burlap hanging wall art is ready. Find the best spot on your wall to display it. Use nails, hooks, or picture hangers to hang it. Step back and enjoy your handiwork!
Creative Ideas for Customizing Your Burlap Art
Burlap is versatile, and you can make your wall art unique. Here are some ideas:
- Add fabric accents: Mix burlap with linen or cotton for texture and contrast.
- Use layered designs: Stack burlap with different designs for depth.
- Incorporate natural elements: Add small branches, dried flowers, or leaves for a rustic feel.
- Create a gallery wall: Make several pieces and arrange them in a gallery-style display.
Benefits of DIY Burlap Hanging Wall Art
Creating your own burlap hanging wall art has many benefits:
- Personalization: DIY art lets you express your style, making your home unique.
- Satisfaction: Making something yourself is rewarding, knowing it’s special.
- Cost-Effective: Burlap is affordable, so you can make beautiful art without spending a lot.
DIY Burlap Hanging Wall Art,DIY Burlap Hanging Wall Art.
Conclusion
DIY burlap hanging wall art adds a personal touch to any room. You can choose from simple designs to nature-inspired patterns. This guide helps you create unique artwork that enhances your space and shows off your creativity.
FAQs
1. What materials do I need to make DIY burlap hanging wall art?
To create your own burlap hanging wall art, you’ll need:
Burlap fabric
Wooden dowels or frames
Scissors or a rotary cutter
Fabric paint or markers
Stencils (optional)
Twine or rope for hanging
Hot glue gun or fabric glue
2. Can I customize the design of my burlap wall art?
Absolutely! Burlap is a versatile material that works well with stencils, freehand painting, or even embroidery. You can create patterns, quotes, or abstract designs to match your home decor style.
3. How do I hang burlap wall art securely?
You can hang your burlap wall art by attaching twine or rope to the wooden dowels at the top. Use nails, hooks, or adhesive strips to secure it to the wall. Make sure the weight is evenly distributed to prevent sagging.
4. Is burlap easy to work with for beginners?
Yes, burlap is beginner-friendly! It’s durable and easy to cut, paint, or glue. However, it can fray, so consider sealing the edges with fabric glue or using a fray-resistant burlap.
5. How can I make my burlap wall art more durable?
To make your burlap wall art last longer:
Use fabric sealant to protect the design.
Avoid placing it in high-humidity areas.
Handle it gently to prevent fraying or tearing.